Monday, June 4, 2012

Coloring residues by chemical shift errors


I wrote a quick script to replace the b-factor column in my .pdb files with the error in C-alpha chemical shifts (between experimental values and CamShift prediction of that same structure). This was the easy part.
At first PyMol would color the ensemble snapshots with the b-factor values of the first structure. The trick was to load the ensemble object with discrete=1, which loads an individual set b-factors for each structure. The last thing to be adjusted are the minimum and maximum values for spectrum-coloring.

reinitialize
import glob

def load_structure():

  native_pdb_file = "/home/andersx/color/1PGB.pdb"

  for x in glob.glob("/home/andersx/color/1PGB_opls_colorensemble/col_sample_*.pdb"):
    cmd.load(x, "ensemble",discrete=1)

  cmd.load(native_pdb_file, "native")

  cmd.align("ensemble", "native")
  cmd.hide("all")
  cmd.center("all")
  cmd.h_add

  cmd.show("sticks", "ensemble")
  cmd.hide("sticks", "ensemble &! n. n+ca+c+o+h")

  cmd.show("lines", "native")
  cmd.hide("lines", "native &! n. n+ca+c+o+h02")

  cmd.spectrum( "b", "blue_red", minimum=0, maximum=8)

  cmd.color("grey", "native")

  cmd.bg_color("white")
  
  
load_structure()


The final result looks something like this:


Tuesday, April 17, 2012

Getting music from the interwebz (the truely easy way)

Just found these two neat methods which I wish to share with the rest of the world. I wish the mainstream channels (iTunes store, etc.) was this easy. Personally, I put my own MP3 library into my Spotify and wirelessly synch my with iPhone and iPad. No virtual machines needed to synch via iTunes no more. Yay.

Anyways, on to the news here ... The first of these two gems is called GrooveDown. It uses the GrooveShark API and connects to GrooveShark's music library. It's written in Java so it's also platform independent - a plus for us linux people. Just search for any artist or song and add it to the download list. GrooveDown will then connect and download the selected songs in MP3 format.  It IS as easy as it sounds.

Download GrooveDown here: http://groovedown.me/


 Image courtesy of the GrooveDown FAQ.
 
The second method is to extract audio from YouTube videos. This is super easy. Hop on to a website called http://www.vidtomp3.com/ and simply paste the URL for the YouTube video. Seconds later you are presented with a download link for an MP3-file containing the audio of the YouTube video. I can't see how this could be done any easier.


Fine print: I'm not responsible if you use the above information to break any copyright rules that might apply, neither am I responsible if you turned a video of a boring talk into an excruciatingly boring MP3-podcast.

Saturday, January 7, 2012

How easy it is to setup an SVN repository! Or how easy backup and version control really is ...

This post serves to spread the use of version control and easy backup in science and everyday life. SVN (an abbreviation of Subversion) is in my opinion the simplest method. Mostly because it is extremely easy to use and setup.

All you need is a server with SSH access and SVN installed for the most basic way to set up and use SVN. Most research clusters will have this. Our research cluster (cleverly named sunray) already has both, and I will use it to demonstrate how I set up an SVN repository for my latest project, which is an API for building peptide fragments and set up NMR calculations and subsequent data analysis.

On 90% of newer Linux distributions one of the two following commands should install everything required for SVN. This is needed on both the server and all clients.
andersx@computer:~# yum install subversion # as root
andersx@computer:~$ sudo apt-get install subversion
Now, let set up the repository on the remote server, from which we can access the repository from. First, create a directory where you want your repository to live. I use a folder called ~/repositories to keep all my repositories in as sub-directories. My project in this example is called fragbuilder:
andersx@sunray:~$ mkdir /home/andersx/repositories/fragbuilder
andersx@sunray:~$ svnadmin create /home/andersx/repositories/fragbuilder
The command "svnadmin create" sets up the repository. This is all you ever need to do on the server. Now you can log out and forget about it.

Now hop on to the client computer. My laptop "awesome" is used in this example. First, we need to get a copy of the newly created repository. This is called "checking out" and abbreviated "co":
andersx@awesome:~$ svn co svn+ssh://sunray/home/andersx/repositories/fragbuilder

This creates a directory named fragbuilder which is under control of SVN. In this folder, put all my project files, I must:
andersx@awesome:~$ cd fragbuilder/
andersx@awesome:~/fragbuilder$ cp -r ../torsome/* . 
# I.e. just copy your project files into the folder

Whenever new files are added to the folder, put them under version control by SVN by adding them to the repository:
andersx@awesome:~/fragbuilder$ svn add *

When you're done with tinkering with your project files and want to send them back to the server use (this is called "to commit" abbreviated "ci") use the following command. A good habit is to add a comment, so you can remember what was changed before your last commit. This is done with the -m "comment" option:
andersx@awesome:~/fragbuilder$ svn ci -m "Created SVN repository"

Next time you want to update your working copy to the latest version from the server, simply update ("up") in the working directory:
andersx@awesome:~/fragbuilder$ svn up

In a perfect world, I commit when I leave my work place, so if my laptop gets stolen, I still have a backup, and I can update what I did at work when I get home.

The last useful command  I want to show you today is how to update to a previous version. Let's say you want to revert to revision 233 of your project:
andersx@awesome:~/fragbuilder$ svn update -r 233

This will revert your working directory to how things were under revision 233.

For the most part, all you need to ever type is svn ci -m "comment" or svn up. This is how easy backup and version control is and should be!


Monday, December 5, 2011

How to run MOPAC6 on a modern Linux machine

Ahum, so we were trying to test the differences between AM1 and PM3 in GAMESS and MOPAC2009 and surprisingly we found a not insignificant difference in the total energies. The energies are shifted by a constant factor of roughly ~1.000014.

However, going back to the MOPAC manual (http://openmopac.net/manual/fun_con.html) we see that the implementation of physical constants were changed in 1993. The GAMESS implementation of semi-empirical methods is basically the MOPAC6 Fock-formation code with some GAMESS routines to diagonalize the whole shebang (for at least as far as single-point energies goes - I haven't been looking at derivatives yet).

Most likely this difference is due to conversion factors between kcal/mol (what MOPAC will give you) and hartrees (GAMESS). For instance, this table I randomly found on the Internet, which is "taken from and old book by Karplus and Porter", says that 1 Hartree = 27.2107 eV, while Jimmy Stewart (Mr. MOPAC) says it's more like 27.2113961 eV. I guess the hartree must recently have been increased in energy along with the speed of light and neutrinos ...

Anyways, I wanted to go back and try MOPAC6 and see if the problem was in the code there. Compiling the MOPAC6 source code, however, proved very difficult, since the source syntax in certain places is not compatible with a newer gfortran, and not even my fall-back f77 compiler would eat it. However, Intel's trusty old Ifort compiler was willing to eat MOPAC6 code, albeit with a couple of warnings. 
However, then the second problem arised. The Makefile was seemingly buggy and refused to work out-of-the-box on my Ubuntu 10.10 machine. So I decided to make a Makefile that would actually run. The script can be found at the bottom of this page, and compiles like a charm, if you have Ifort. Ifort is free for non-commercial use, and usually also quite a bit faster than gfortran.

However, a possibly more simple (and possibly more fun) option is to install Wine (a Windows compatible environment for Linux) and use Wine to execute Mopac. Jimmy Stewart has a Windows compatible binary version of MOPAC6 available for download. Now, lemme show you how to install Wine and fire up MOPAC! On Ubuntu this is as simple as (let's say you have a file named methan.mop):


$ sudo apt-get install wine   # This installs WINE

$ wine mopac6.exe methan      # This runs MOPAC6 via wine with methan.mop


And that's it! Either get Ifort (free for non-commercial use) or use Wine to run MOPAC6 via the binary. I honestly found the last method to be hilarious, but I guess I'm not too different from the guy below.


The newest MOPAC and GAMESS are available for free for personal and academic use.

UPDATE: Just a short note on how to run the compiled version of MOPAC6. First, rename mopac.exe to MOPAC. Next, set the mopac directory in mopac.csh. Now open a cshell and use the mopac.csh script to envoke MOPAC6:

$ csh                     # Start a cshell
% source mopac.csh        # A script necessary to run MOPAC6
% mopac methan            # To actually run MOPAC6 with the file methan.mop


$ indicates bash shell, and % indicates a cshell.


MOPAC6 Makefile for Intel Ifort: (put it in the source code directory and type 'make')

Saturday, December 3, 2011

Fixing disabled wireless on Lenovo Z360 running Ubuntu 10.10

Ok, this post isn't about chemistry at all. However, I'm going to defend it under the category of free software. Here is a short introduction to my problem. I have a Lenovo Z360 laptop running Ubuntu 10.10. It came with some Windows distribution (are they even called distributions? I haven't had a windows computer since 2004) which I never used. <sarcasm> Thanks to Lenovo, the laptop was set up with some proprietary driver software for my wireless network interface card (NIC). </sarcasm>

After installing Ubuntu 10.10 (AKA the perfect 10) everything was working fine ... until I one day pressed the "turn off wireless" buttons (Fn+F5) to save a tiny amount of battery power. This apparently bypasses the hardware "disable wireless switch" and switches off wireless via some built-in firmware. And since I wasn't using the proprietary drivers in Windows, there was no way to switch wireless back on. 

The tedious solution to my problem was to replace the solid-state drive I had put in myself for the original drive, and boot up in windows, switch on wireless using the proprietary driver software. 
Long story short, I have up until this day always been carrying the original harddive and a small screwdriver with me, in case I should accidentally turn off wifi, so I could perform the wireless-enabling surgical procedure.

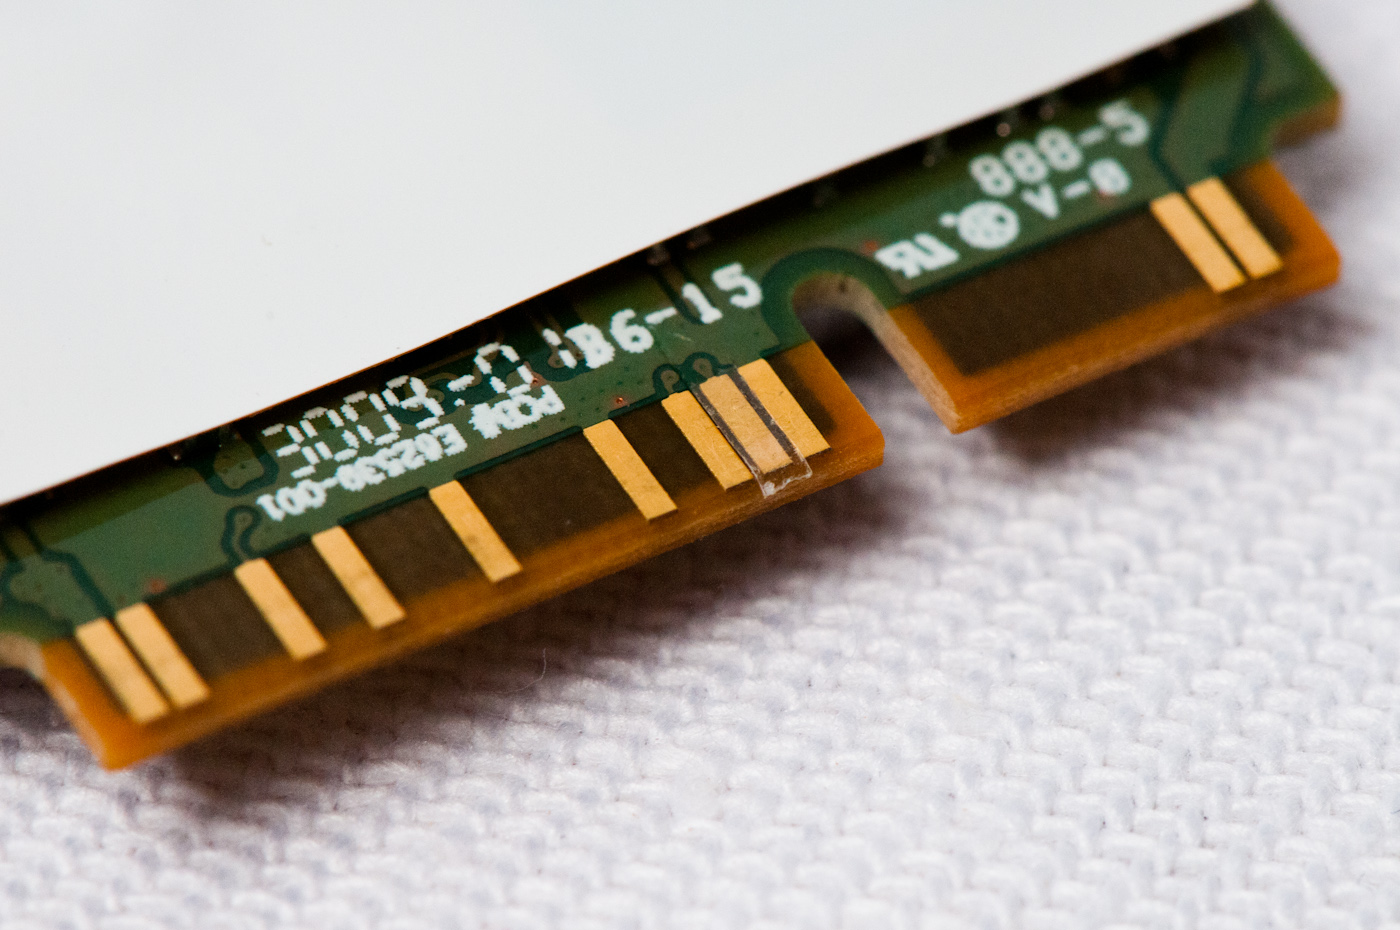
However, today I stubled up a more permanent solution. I turns out, that the signal to turn off the wireless NIC is transmitted via pin #20. So to avoid ever turning off wireless you just have to tape over that particular pin - see the picture below. After five minutes of fiddling with tape, tweezers and scissors I managed cut a piece of tape small enough and put it precisely over the pin. 
And lo and behold - it's now impossible to disable the wireless NIC via switches or accidental key-presses!


Thanks to the guys over at anandtech.com for pointing this out! And thanks to Lenovo for this post possible by making hardware that just works out-of-the-box-until-it-doesn't-and-there's-no-way-to-switch-it-back-on-besides-software-only-written-for-one-particular-operating-system.

Code snippets on blogs

I had a brief discussion with Casper Steinmann about how to present code snippets in blog-posts. We both agreed that nice formatting is really important. We also agreed that our previous attempts to do so were (and still are) crummy.

One of the (easy) ways to set up nice formatting can be found over at CraftyFella:


Just put some stuff in your blogger template and all you have to do is wrap your code examples in HTML <pre>  tags. "Pre tags" denote a pre-defined format, and are often used to wrap around code examples, with the color coding pertaining to that particular code-language and an equispaced font, which makes it possible to use indentations properly.

Most popular programming languages are supported in this method. C, C++ C#, python, and probably many others. Hoever, no support for FORTRAN - quantum chemists beware. If you know of a user-friendly syntax highlighter that does FORTRAN, do leave a comment! Everybody loves FORTRAN.

Here is a simple example of how a dumb python script looks after using CraftyFella's guide to set things up:

#!/usr/bin/python

def print_string(string):
    print string

hello_world = "Hello world, look at my fancy code formatting!"

for i in range(10):
    print_string(hello_world)

... and a little bit of C++:

//! Return size of collection
//! \return size of collection
unsigned int size() const {
     return data_vector.size();
}

Sunday, November 6, 2011

Molecular dynamics and supercomputing, past and present

What is the most powerful single computer you can get today, measured in sheer numbers of double precision floating point operations per second (flops)? Possibly, the answer is a rack server (such as the HP half-width 4U in the picture below) with no less than eight(!) Nvidia Tesla M2090 cards installed. Each card offers a theoretical max of 665 Gflops of double precision computing power -- a total of 5.3 Tflops (not counting any CPUs). Now, go to the Top500 and find the list from 10 years ago ... November 2001. Just one of these servers would bring you a safe 3rd place on the list - very impressive for just ONE single machine.

Foto

One might argue, that a 4U rack unit is not a very practical computer - so what's the max you can cram into a a standard sized ATX chassis these days? Well, take four of these GPUs (and a good power supply), and you're up to about 2.7 Tflops, theoretical peak. 10 years ago that would bring well into top10 world wide with a box that you could put under your desk!

The Japanese "K Computer" is currently the fastest cluster out there and recently broke the 10 Pflops barrier (10¹⁶ flops)! Now, he question is, when can I expect to have that kind of performance in a desktop PC, and how about my huge ms protein molecular dynamics simulation?

Speculating on the future is difficult, so I'm just going to "re-blog" this review paper I stumbled upon by Michele Vendruscolo and Christopher M. Dobson, "Protein Dynamics: Moore’s Law in Molecular Biology", Current Biology, 21, R68-R70 (2011), which speculates on the future of MD simulations. According to the authors, MD computing power sees exponential growth, so hopefully, I can one day have a 10 Pflops (I'm willing to settle for less) box under my desk. Here are some of the bold predictions from the paper:


  • In 2010 we saw the first nanosecond scale MD simulation of the Ribosome
  • In 2030 we'll be moving up to millisecond  scale MD simulation of the Ribosome
  • in 2050 we'll be doing all-atom dynamics of entire bacteria on a nanosecond scale.

I can't wait to get older and see an all-atom bacteria simulation!